To verify your domain, you'll need to choose 1 of 3 different methods: DNS, HTML, or a meta tag in the header.
To implement domain verification, you need to choose between 1 of the 3 different methods:
- Add a DNS TXT entry to your DNS record to confirm that you own the domain
- Upload an HTML file provided by Facebook to your web directory and confirm domain ownership in Business Manager.
- Add a meta tag to the <head> section of your domain home page
*You only need to use one verification method!
Option A) Adding DNS TXT
The DNS Verification tab of your selected domain provides the TXT information you will need to apply to your DNS record.
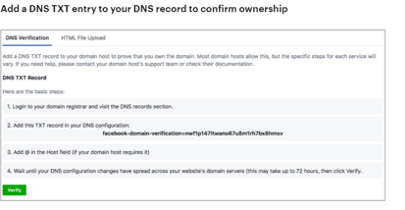
- Navigate to the DNS record section of your domain host.
- Add the TXT entry to your DNS record
- Add @ to the Host field (if required by your domain host)
- Once the changes have propagated across your domain's web servers, click the Verify button at the bottom of the DNS Verification tab for the selected domain.
Note: Typically, this change takes only minutes to occur; however, there are cases where it may take up to 72 hours to complete. - Leave the TXT entry in your DNS record as it may be checked periodically for verification purposes.

Option B) Using HTML File
The HTML File Upload tab of your selected domain provides the HTML verification files you need to upload to your website.
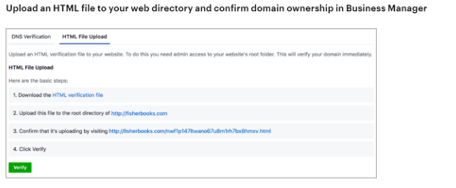
- Download the HTML verification file
- Upload the file to the root directory of your website. You will be able to see that it is uploading at the link provided in the HTML File Upload tab.
- Once it is done, click the Verify button at the bottom of the HTML File Verification tab for the selected domain.
- Leave the HTML verification in your website's root directory as it may be checked periodically for verification purposes.

Option C) Using a Meta Tag
The Meta Tag Verification tab of your selected domain provides the meta tag you need to add to your domain home page.
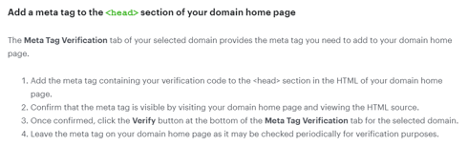
- Add the meta tag containing your verification code to the <head> section in the HTML of your domain home page.
- Confirm that the meta tag is visible by visiting your domain home page and viewing the HTML source.
- Once confirmed, click the Verify button at the bottom of the Meta Tag Verification tab for the selected domain.
- Leave the meta tag on your domain home page as it may be checked periodically for verification purposes.
Once you've done one of the three options above, you'll need to identify your 8 conversion events for Facebook's Aggregated Event Measurement.
Read our instructions on how to identify your 8 conversion events here.